Hardware Assembly
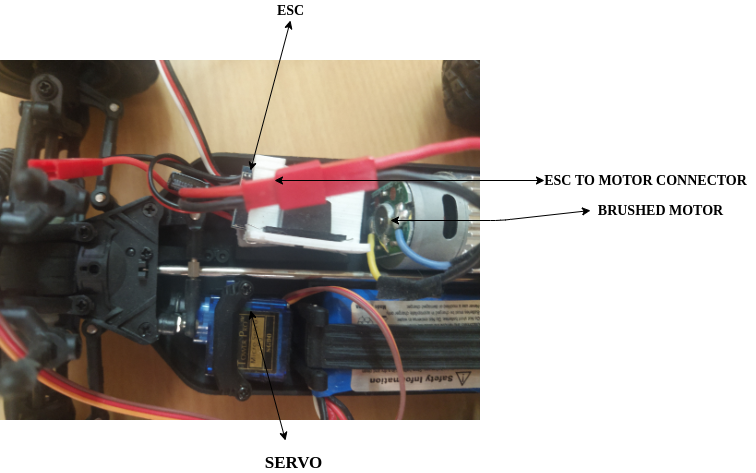
1. Remove old Servo and ESC
- Remove the upper part i.e case attached to RC car by sliding the 4 pins placed near the case.
- Servo we get is 5 pin which cannot be pwm controlled. Hence it needs to be replaced.
- Just remove the screws which kept the servo intact. Also remove the front steering screw.
- ESC should be detached carefully because it is hold to chasis with the help of doble side tape.
- Cut the wires between esc and motor.
2. Remove connector from old ESC
- You need a soldering gun and wire to connect the multistrand wire coming from motor to esc.
- Remove the the two pin connector from old esc to motor.
- And solder the above connector with motor.
3. Connect new Servo,ESC with PCA and Motor
- Servo can be attached to front steering wheel using a coupler and screw that you removed previosuly.
- Use the ESC 3d printed part housing and double sided tape to place esc on chasis.
- Connect the battery that comes with RC car to esc and turn on the switch to activate esc.
Warning
- The light from esc turns on only when pwm waves are sent for the first time.
- If servo doesnt fit to your coupler then use sand paper to rub the coupler untill it fits in.
- Dont use the car after the lipo battery is down.You will notice slow movement of car if battery is drained.
4. Wiring between PCA and Raspberry Pi 3B

Step 1: PCA-9685 Board Pins and its connection
Below is the list of Pins used
VCC: Connected to GPIO-1 Pin of Pi
GND: Connected to GPIO-9 Pin of Pi
SDA: Connected to GPIO-3 Pin of Pi
SCL: Connected to GPIO-5 Pin of Pi
CHANNEL-0 PWM: Connected to ESC white pin
CHANNEL-1 PWM: Connected to Servo Orange pin
Step 2: ESC Pins and its connection
White: Connected to CHANNEL 0 PWM pin
Red: Connected to CHANNEL 0 VCC pin
Black: Connected to CHANNEL 0 GND pin
Step 3: Servo pins and its connection
Orange: Connected to CHANNEL 1 PWM pin
Brown: Connected to GPIO-6 of pi
Red: Connected to GPIO-2 of Pi
5. Assemble 3D printed parts

- Assemble the parts as shown in the above picture.
- Use screws that come with servo for assembling board.
6. Camera Connection

- Use the CSI cable that comes with Raspberry Pi camera to connect to Rpi.
- Use Camera stand i.e 3d printed part to attach camera to it with the hep of screw or double sided tape.
7. Cardboard Pieces for Battery support
- 10000mah powerbank if it is large then build a custom wooden board as shown above.
- If battery is small enough ,then it can fit below the Board.
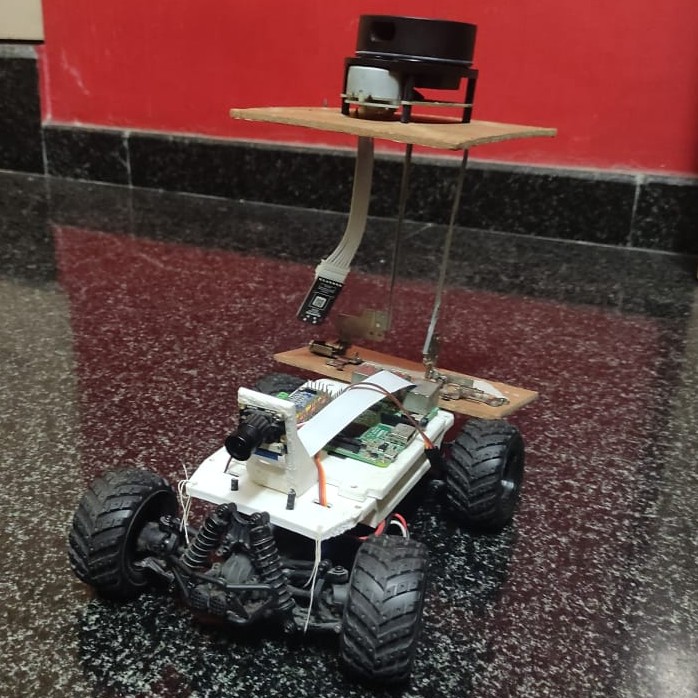
Final Car Outlook